Filters are used to ‘boost or cut’ certain frequencies of a track, or to change a sound for creative effect.
‘Static filters‘ like a high-pass filter (HPF) might be used to remove unwanted low-end frequencies from a vocal track. It would also help separate the vocal track from the other instruments, like guitar, and add clarity to your mix.
‘Moving filters‘ like a band-pass (BPF) controlled with a sinewave LFO would create an auto-wah effect. Any type of filter or parameter can be controlled this way with an LFO to create different types of sounds.
Filter types include: high pass (HPF), low pass (LPF), band pass (BPF), notch, peak, and comb filters.
Why Would You Add or Remove Frequencies with a Filter?

It is important to remove frequencies, so instruments don’t occupy the same space in a mix.
A piano and guitar occupy some of the same frequency range, so you might use filters to separate them.
Filters also let you add frequencies for creative effect.
For example, you might add 80HZ to a bassline to give it a more booming bass sound.
Types of Filters
All filters either ‘remove or add certain frequencies’ to a track. The most commonly used types of filters include: high pass, low pass, band pass, peak, notch, and comb filters.
High Pass (HPF) – a high pass filter removes the low frequencies below a point.
Low Pass (LPF) – a low pass filter removes the high frequencies above a point.
Band Pass (BPF) – band pass filters allows a wide or narrow band of frequencies to be heard and removes the highs and lows.
Notch Filter – notch filters can be used to remove frequencies in a narrow band, like hissing on a vocal sound.
Peak Filter – peak filters boost a frequency in a narrow band.
Comb Filter – a comb filter is a type of signal processing which creates a 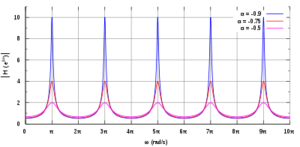 slightly delayed digital copy of itself.
This causes constructive and deconstructive interference in a waveform that creates a series of peaks resembling a comb.
Comb filters are used mostly for creative effect. Comb filters create a sound which is similar to a phaser or a flanger.
How to Control Filter Parameters
Filters might be used to separate frequencies of your tracks, or they can be used to creatively color or mangle your sound.
You can also control the parameters of your filters with LFOs (low-frequency oscillators), envelopes, sample and hold, and side-chaining.
LFOs
Low frequency oscillators like a sinewave, squarewave, or sawtoothwave can be  used to control ANY parameter of a filter.
For example, you can use a sinewave to control the frequency of a bandpass filter and make an auto-wah effect.
If you used a sinewave to control the volume, you would get a tremolo effect.
If you used a sinewave to control the pitch, you would get a vibrato effect.
Envelopes
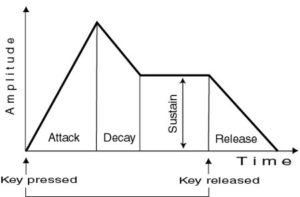 A a sound’s envelope is the attack, sustain and decay of a sound.
You can use the envelope of a sound to control parameters like pitch or a bandpass filter.
Sample and Hold
 Sample and Hold is a type of LFO that ‘grabs and holds the voltage’ of a signal, then lets go after a certain period of time.
It creates an almost random sounding movement of a filter.
Sidechaining
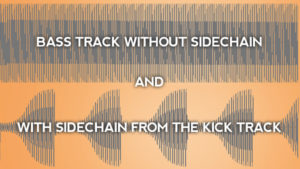 Sidechaining allows you to control a filter with the input of another track.
For example, if you side chained a kick drum to control a the frequency of a band pass filter, each time the kick hits, your synth would create a wah effect.
Sidechaining a Filter to Warp your Audio
One interesting effect that can be done with sidechaining, is to use a kick drum to trigger a filter sweep, each time the kick hits.
Here’s a video that shows you how to sidechain a filter to a kick drum in Ableton for a cool effect on a synth pad:
2 Filter Plugin Reviews and Demos
Etch
I liked Etch, because it really allows you to warp the characteristics of a sound.
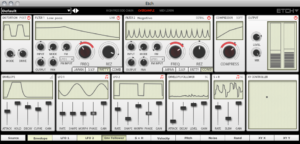
Etch allows you to easily tweak MANY of parameters to create some very unusual sounds.
The Etch presets were divided into 6 sections: non-moving filters, sweeping filters, light coloration, heavy coloration, crazy, and self resonating.
Here are the Features i liked:
-
- radically altered the sounds
- i liked messing with the self resonating filter patches and using them to really warp the sounds.
- also included the basics like bandpass, notch, resonating.
- i like the simple interface
- certain parameters altered the sound so much, they were like instruments
Features i disliked: none. It has everything i would want included in a filter plugin. The interface is also easy to work with.
Advertised features of Etch:
- 3 classic synthesizer filter models
- traditional filtering including: high-pass, low pass, band pass, notch, and peak filters.
- comb filtering for detuning, pitch-wobble, and chorus/phaser textures
- internal TransMod modulation system
Etch comes in VST, AU, and RTAS formats.
The cost of Etch is $99. Try a demo of Etch here.
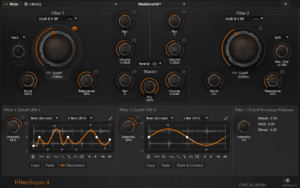
Filtershaper 3
Filtershaper3 does give you the ability to color and warp a sound using multiple filter types.
Here are the Features i liked:
-
- it provided basic filtering to create effects like tremelo, phasing, and wobble.
- simple interface
Features i disliked:
- had to dig into the settings to create interesting sounds
- presets were unorganized
- pop-up window, when you alter a present, then try to move to the next preset.
This plugin comes in VST and AU format.
The cost of Filtershaper3 is $79. Try a demo of Filtershaper3 here.