Side-Chaining Tricks in Ableton Live 9

Hi guyz. Its me. PuzzleVortex.

This week, i’ve been experimenting with some super-secret side-chaining tricks in Ableton Live 9.  

Currently, I’m using my side-chaining techniques to create ‘inverse gating’ on my pads, ‘stutter effects’ on vocals, and to add ‘percussive filter effects’ to my basslines.

Below, I discuss the following topics:

  1. Side-Chaining Basics
  2. Pumping Basslines with Side-Chain Compression
  3. Side-Chain Filtering Effects
  4. Rhythmic Side-Chain Gating
  5. Experimental Side-Chaining

Side-Chaining Basics

‘Side-chaining’ is a technique where you use the envelope of a track to ‘trigger’ an effect, like compression, gating, or filtering on another track.

Side-Chaining can create effects like:

  • reducing the volume (ducking) of a bassline each time the kick hits
  • triggering a filter sweep (auto-wah effect) on pads in a rhythmic pattern
  • breaking up a synth pad into rhythmic parts with gating

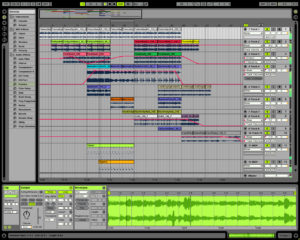
How to Setup a Side-Chain in Ableton Live 9

Side-chains are very simple to setup in Ableton Live 9 with their native plugins.


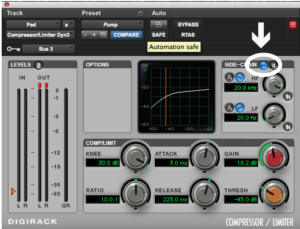
The native plugins which allow you to setup a side-chain input include: the compressor, gate, and filters.

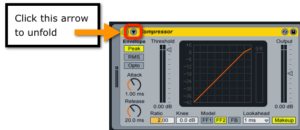
How to set up a sidechain: First, open the side-chain menu, by clicking the ‘arrow’ button on the top left. Next, choose the ‘trigger track‘ from the drop-down menu.

  • (NOTE) You should MUTE the the side-chain trigger track, if you don’t want to hear its output.

How to Create Pumping Basslines with Side-Chain Compression

Side-chain compression is an effect which is often used to create “pumping basslines” in electronic music.

Side-chain compression can also help to separate the kick and the bass, by removing some low-end frequencies in your mix.

This makes the kick more clear and audible.

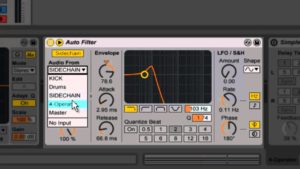
How to Trigger Filter Sweeps with a Side-Chain

Side-chaining can also be used to trigger filter sweeps in a rhythmic pattern.  

It create an auto-wah effect which sounds good on pads, basslines, and percussion.

To add a sidechain: First, click the arrow in the top left. (see left image)

Next, choose a trigger track, from the drop-down menu.

Side-chains can be used to trigger all types of filters, including high, low, peak, and bandpass filters.

Inverse Side-Chain Gating on Pads to Thicken Drum Sounds

Inverse Side-Chain Gating can be used to open up a gate at the same time as a trigger track.

This is a great way to fatten a kick or drum sound.

It allows the pad to come through the gate at exactly at the same time as a drum sound, which gives it a full, rich, sound.

The vid below discusses side-chain gating:

Shaping a Bassline with Side-Chain Compression and Gating

A bassline sounds the best when it’s attack is the loudest, right when the kick hits. 

Side-chain compression or gating can also be used to sculpt a bassline’s attack.

This be used to fix mistakes a bass player makes, by accentuating the attack directly on the beat.

Experimental Side-Chaining Effects

Side-chaining can also create more experimental effects like: an 808 sub kick with gating, vocal stutter effects with gating, and rhythmic gating effects on pads.

  1.  Adding an 808 Sub Kick using a Gate

You can use inverse side-chain gating, to add an 808 sub which is triggered along with a kick drum.

An 808 sub can be created by adding a gate to a sine wave patch, triggered by the kick drum.

Try changing the pitch of the sine wave, to create a ‘tuned 808 sub kick’.

2. Side Chain Gating to Create Vocal Stutter Effects 

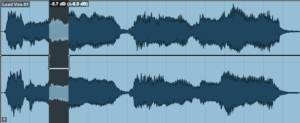
I’ve also been experimenting with ‘vocal stutter effects’ created by side-chain gating.

Vocal stutter effects can be done by creating a percussion track which triggers your gate. The vid below explains in more detail:

3. Use Beat Repeat to vary the rhythms of your Side-Chain Trigger Track

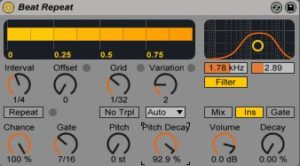
Try adding the beat repeat plugin to your trigger track. This can alter the rhythm of your ‘trigger input’ to create cool rhythmic gating, compression, or filter effects.

4. Separate the Bass and Kick With Side-Chain Compression

One way to help your kick cut through your mix, is to add some side-chain compression to your bassline.

Adding some volume reduction with side-chain compression will remove some of the low frequencies each time the kick hits.

This lets the kick be very audible in your mix.

You have any super-secret, side-chain tricks i should add? Tell me @puzzlevortex

Powerful Midi Tricks in Ableton

Hi Guyz. Its me, again. Your friend, PuzzleVortex. (@puzzlevortex)

This week, i learned some extremely powerful ‘new midi tricks’ in Ableton Live 9

I love working with midi, because it lets you create unlimited revisions of your notation, your effects processing, as well as parameters like pitch bend.

Ableton 9 even has a new feature that lets me record audio parts with my guitar, then turn them into a midi track. (its awesome.)

In this article, I’m going to explain how to:

1) and convert live audio (including a guitar signal) directly into midi notes
2) create melody variations, with Midi Effects
3) slice up loops, into individual parts, that you can control with midi
4) create melodies and loops more quickly in Ableton

Why Writing with Midi is Vastly Superior to Audio

Over the last few months, I’ve been experimenting with my production like a mad scientist.

I’ve been testing new gear (DDJ-SX2 DJ Controller), a new DAW (Ableton Standard), new VST synths (Serum and Cycle), new effects plugins (like StutterEdit), and new techniques. I want to improve my production in every respect.

I’ve also completely switched from writing in audio, to writing with midi. It is a superior way to work. (it seems kind of obvious now)

Ableton Live 9 allows you to transition from live audio to midi, with one simple click.

I’ve been using this feature to transform my guitar parts, into midi parts.

I think Ableton is a great writing tool, in addition to being a great DAW.

How I Create Quick Melody Variations with Midi in Ableton

One simple midi trick in Ableton, is to use the doubletime, or halftime button to test variations of your melody.

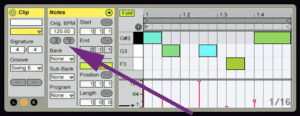
Just click the +2, or :2 button, when you are working with a clip.

Your midi notes will become half speed, or double-time.

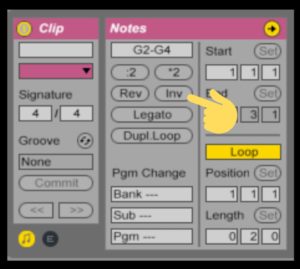
You can also invert the melody, or put it in reverse, with just one click.

This is great when you are create additional loops, to be arranged later in Arrangement View.

Here are some additional Midi Tricks:

1. Hold SHIFT with your UP/DOWN arrow keys (or trackpad) to Transpose by an octave instead of 1 semitone.

2. Midi notes can be quantized (placed directly on the beat) with the hotkey command-U.

Using Midi Effects to Alter Your Melody

A great feature of the Ableton DAW are its Midi Effects.

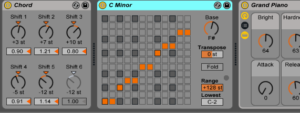
Midi effects allow you to change the speed, pitch, rhythm, scale, and more by dragging a midi effect into your track.

I love to try unusual scales with my midi parts, using MIDI Effects.

It’s very easy to drag a Harmonic minor, or Ukrainian Dorian scale onto your midi part, for example, with one click.

Other types of midi effects allow you to change the note length, velocity, add an arppegiator, even add glitches for effect.

The video below goes a little more in depth with Midi Effects:

Transforming a Live Guitar Signal into Midi Notes in Ableton 9

I just learned that you can turn a live guitar signal into midi notes as a new feature in Ableton Live 9.

I’ve been playing guitar since i was 10.

Its been difficult to translate guitar performance into electronic music, because most controllers are keyboards.


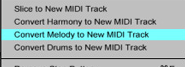
But, in Ableton Live 9, all you have to do is ‘right click’ on your audio part, then click ‘convert melody to midi track’.

You can even convert chords into midi, by converting ‘Harmony to Midi’.

This ‘audio to midi’ feature works with any type of live audio, like strings, piano, etc. (But, i’m sure some stuff will convert better than others)

The video below explains it a little more in depth:

Slice a Drum Loop or Sample into a Midi Track

The Slice to Midi feature allows you to ‘cut up an audio file into slices’, which can then be controlled via midi notes.

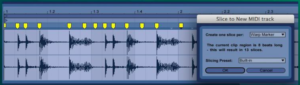
This is especially cool for drum loops.

Its easy to slice up any drum loop into a brand new drum kit, which you can control via midi.

I did a quick test of the slice to midi feature with a Neil Degrass Tyson vocal clip.

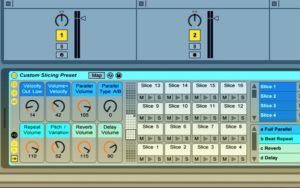
It was really cool to control these sliced up vocal snippets, via midi and automation.
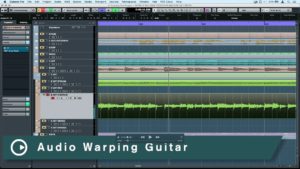
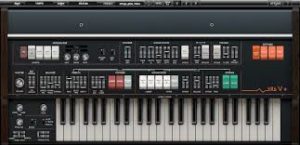
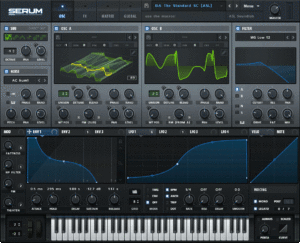
You can even alter the vocal parts with pitch bend, LFOs, and other types of midi controls.

Warping in Midi

Ableton lets you easily warp a sample to fit ANY tempo, by placing warp markers at key points on your sample.

I haven’t really gone too in depth with sample warping in my music, but I can see myself using it with vocal samplea.

It allows you to stretch or compress a sample with ‘warp markers‘ which are easily adjustable, instead of stretching or compressing each part of the sample individually, like i would do in Pro Tools.

Here’s a vid that better explains how to warp your samples to fit any tempo:

There are MANY new features that i am testing in Ableton. But i’m still learning, so if you have any midi tricks that you think i should include, let me know @puzzlevortex

My Serum VST Synth Review (One of the Best Synths i’ve ever used)

Hi Guyz. It’s me again. PuzzleVortex. Below, i review the Serum VST Wavetable Synth. BUT first, I have confession to make…

I just bought about $2000 worth of gear that i can’t afford. I put it all on layaway at Guitar Center. (dont judge me ;/)

Within the last month i bought a Pioneer DDJ-SX2 Dj Controller, Ableton Live Standard Edition, Serum VST Wavetable Synthesizer, and an Ebow.

I needed new gear because my production was getting stale. I think these new tools will help me improve, and change my sound.

I’ve been testing lots of new DAWs, plugins, and hardware. I think reviewing them will help my own production, but also to help other producers learn about new gear.

Below, is my Serum review. (spoiler: I love it.)

My Serum VST Review

So, 2 weeks ago, I bought a new DAW, Ableton Live.

I’m getting the hang of it, but there’s a learning curve.

I like Ableton because it is more of a writing tool and DAW combined. I love its advanced midi tools. I can create a track very quickly, and revise it very easily.

Along with my purchase of Ableton, I also bought an Advanced Wavetable VST Synth Plugin called Serum.

The Ableton Live (Standard Version)  comes with 100’s of samples and virtual instruments.

BUT, i personally think the Ableton Standard sounds are just average.


The Serum VST Synth Plugin is by far superior to the stock sounds.

I needed to own it. (so i got it with Xfer’s rent-to-own plan)

Here are the main features of Serum VST:

  • 4 sound generators
  • 2 wavetable oscillators
  • a flexible noise generator
  • and a nice sub oscillator.
  • 10 effects processors

Serum’s Interface

Serum’s interface looks pretty damn slick, and is extremely easy to use.

You can even use images as Wavetables (<—see left).

There are also a multitude of parameters to modulate and automate.

The cost of Serum is $189.

The only negatives of Serum are that it might be a little taxing on your CPU power. But, i haven’t had any problems so far. I’ve only made one track in Ableton so far, and i haven’t had any problems with my CPU power. (I’m on a macbook pro 2.5 gz)

Creating Midi Parts, Then Cycling through Serum Presets

One of the ways in which Ableton excels, is with its midi tools.

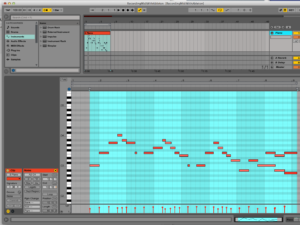
Ableton allows you to: create variations on your midi parts, put them in double time with 1 click, reverse them, put them in a different scale, add an arpeggiator, there are unlimited possibilities.


One of my favorite things to do when i create some midi parts, is to cycle though all of the presets in Serum. (especially with basslines)

Serum really excels with its bass and lead sounds.

It is very inspirational to create midi parts, then cycle through Serum’s many different, unique sounds.

Drawing in Plugin Automation with Serum

One way to get evolving, changing, morphing sounds out of Serum, is to automate and draw in some parameter changes.

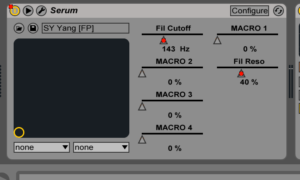
This is very simple to do in Ableton.

In order to automate parameters, all you have to do is click ‘configure‘, in the upper right corner of Serum.

After you click ‘configure’, the plugin will open.

Then, you can tweak any of the parameters in Serum.

The parameters you ‘tweaked’ will now show up in Arrangement view.

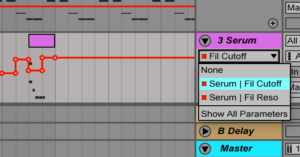
You can then draw in automation of parameters like the filter cutoff, or resonance on the Arrangement view.


Download Serum Presets Here

I just got Serum, So I haven’t created my own Serum patches yet. But, here are some links to some Serum presets i found, which you can download below:

  1. https://www.reddit.com/r/SerumPresets/
  2. https://cymatics.fm/free-download-vault/
  3. https://www.audiobombs.com/items/641/25-free-serum-patches-from-xenos-soundworks
  4. http://patcharena.com/downloads/comment.php?dlid=1315

Other VST Synths You MUST Check Out

I also tried a demo of very cool synth called Cycle. (d/l the demo here).

Cycle is a “visual workflow for synthesizing sound at the waveform and spectrum level.”

Cycle allows you to ‘morph’ a sound over a period of time. It has some great sounding patches. I need to spend more time with it. It is worth testing the free demo. The Cost is $150.

It also looks very, very cool.

The Massive VST Synth

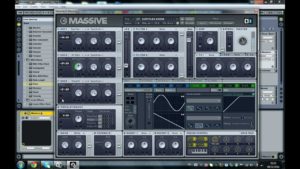
One other VST Synth plugin that i’ve heard great things about, is the Native Instruments Massive VST Synth.

I’ve not had time to test it yet. But, I’ve heard its on the same level as Serum.

It is a synth you should test out. Download the Massive VST demo here.

More Xfer Records Plugins

Since I was really impressed with Serum, i decided to check out the other plugins that Xfer offers.

They include:

  • Cthulhu: The Chord and Arp Monster
  • Nerve: a beat manipulation and creating tool
  •  LFOTool: for tremolo, auto-pan, trance-gate, side-chain compressor simulation, and dubstep-type wobble effect creation.

They offer demo versions of these plugins, so i think i will give them a shot. (you can d/l the demos here). I am particularly interested in testing Cthulhu. (Video  Below)

*I plan on doing many more reviews. If there is any DAW, Effects Plugin, or Synth you want me to try out, pls contact me on twitter @puzzlevortex

Review of Ableton Live 9 (from a Pro Tools User)

HI guys. Its me again, your friend PuzzleVortex. (@puzzlevortex)

I have a serious confession to make.

I just switched from Pro Tools 9, to Ableton Live 9.

Below, I’m going to explain why i’m switching to Ableton Live 9, even though i really love Pro Tools

(sorry digidesign, but i had to do it)

In this article, I’m going to summarize the features that i think will help me create better music, more quickly, as well how Ableton is a very different type of DAW when it’s compared to Pro Tools.

The Ableton features i liked included: midi effects, its ability to generate new melodies by altering your midi notes, its simple light weight interface, the Drum Rack plugin, its emphasis on looping, the ability to perform your music live with a controller, and Serato Scratch Live integration.

ABLETON IS A WRITING TOOL, AS WELL AS A DAW.

Why Would I Dare Switch From Pro Tools, when i really like it?

I’ve been using Pro Tools for over 15 years. I like it, alot. I hit the Save Hotkey unconsciously at this point. If my session crashes, i’m not even worried.

BUT, The whole point of this blog is to experiment with new music production software and post the results. For you, and for ME.

I felt like my production techniques were getting stale, and that i might be missing out on something, by just sticking to Pro Tools. (and i definitely was…)

Recently, I was told about Ableton by a friend, who is a very skilled and successful musician.

I really respect this person for his musical talent, so i thought it would be smart to listen to him.

This convinced me to try the free 30 day Ableton demo. (you can d/l it here)

Once i gave it a shot, i understood why alot of producers are talking about it.

Ableton Live is NOT just a recording DAW. It provides tools to help you create better music, more quickly. It is especially good, if you like working with midi and virtual instruments. It will even help you generate new melodies, based off of a parts you create in midi.

In addition, Ableton Live also has tools to help you perform your creations live.

You can also use the Ableton DAW in combination with Ableton Push (or any other type of controller), to trigger loops, volume changes, effects, or other parameters.

Adding a controller like Push allows you to perform the music you create live.


With its emphasis on looping, Ableton allows me to throw a song together, faster than i ever have.

For electronic music or hip-hop producers, i think Ableton is a great choice as a DAW.

BUT, if you’re more interested in recording live instruments, i think you might be better off in Pro Tools. (which is what it focuses on)

Is It Hard to Get Used to Ableton Live 9?

At first, the transition to ANY new DAW is a little bit painful.

There is definitely a learning curve. You won’t be fluent in ANY new DAW immediately.

Watching Ableton tutorial videos on youtube, is KEY to picking it up quickly. BUT, once you learn the basics, its not that hard.

Here’s an introduction to Ableton video (like the one below), to get you started:

How is Ableton Live 9 Different from Pro Tools 9?

Ableton Live gives you tools to create music with midi, virtual instruments, samples, and looping. Pro Tools focuses more on recording live instruments.

The Ableton DAW centers around the creation of clips, loops, and scenes in midi or audio. These loops are then recorded onto the Arrangement view, for further refinement of your musical ideas.

The loops, clips, or scenes are created in Session View (left image).


You can then arrange the loops, clips, and scenes that you create, in Arrangement View (left image).


Once the parts are recorded in Arrangement view, you can still alter the midi notes, instrument patches, and effects. Working with midi gives you alot of flexibility, that’s why i prefer to work in midi now.

Its easy to adjust all parameters in midi, as the song develops. (That’s why i like working with midi, rather than with audio) If you work with audio, you are stuck with what you have, unless you want to re-record.

This helps to quickly create musical ideas, arrange them, develop them, and then work them into a more structured song.

Which of the 3 Versions of Ableton Do You Need?

There are 3 different paid versions of Ableton which you can purchase.

There is also a full demo version you can test free for 30 days. (try the demo verison here)

If you want to buy Ableton, there are 3 versions:

  • Intro – $99
  • Standard – $450
  • Suite – $800

Here is a feature comparison of all 3 versions on Ableton’s website.

  • The Intro version of Ableton lets you make 16 tracks, 8 scenes, and 2 send/returns. (Its the bare bones version, and its NOT enough, in my opinion.)

BUT, Ableton does offer an upgrade from the intro version at a discount price ($375). So, its ok if you just want to get your feet wet in creating music.

  • If you are more serious about your music, you will need the Standard – Version. This version costs $450. (i just bought this one)
    • The Standard version lets you create unlimited audio and midi tracks (as many as your computer processor can handle). But, it doesn’t contain MAX for live performance, as well as the additional soft synths, and samples that come with
  • The Suite Version of Ableton costs $800.

It comes with extra virtual instruments, sample packs, live tools, and effects processors. I haven’t tried it, so i’m not really sure if its worth it.

(I purchased the Standard Version of Ableton and i’m very happy with it.)

The only additional piece of software i want to purchase for Ableton is the Serum VST, which i completely loved when i tried the demo.

Using Midi Effects in Ableton

One feature which i really liked about Ableton was the ability to use Midi Effects to change or create variations of your melodies.

Midi effects let you alter your midi notes in different ways including the pitch, velocity, length, etc.


For example, midi effects let you use an arppegiator, change the scale, pitch, or add some random changes.

These midi effects can help you create variations on your melody or bassline, which you could use as an additional part.

Here’s a video that shows you how to use Ableton to generate melodies:

Creating an Ultimate Drum Rack in Ableton

I really love creating drum loops with the Drum Rack Virtual Instrument in Ableton.

It is so easy. You just drag in any drum samples, then program your beat with midi.


Drum rack also lets you add effects and modulate any parameter on each individual drum sound. You have complete flexibility.

This allows you to use just one drum rack plugin, so you can keep the strain on your processor low.

Below is a video that teaches you how to put together a flexible Drum Rack in Ableton:

How to Perform Live With Ableton

Ableton was created with live performance in mind, its provides tools to help you do so. Pro Tools does not have this (at least not version 9 which i was using)

Ableton gives you improvisation tools, allowing you to trigger loops, samples, and keep everything in sync.

Ableton lets you to map certain keys on a keyboard (or other controller) to trigger loops, as well as faders, sends, and effects.

Serato Scratch Live Integration

You can sync Ableton Live and Serato Scratch Live by opening them both at the same time. They should sync automatically through software called The Bridge.

Here’s a video that gives you an idea of what is possible with Ableton + Serato Scratch Live:

Now That Ableton is my Prefered DAW, Will i Ever Use Pro Tools Again?

YES. Even though i plan on using Ableton alot, I will still definitely use Pro Tools.

I will use Pro Tools to record live instruments like vocals or guitars, but not for beat creation using virtual instruments and midi.

i think the Ableton software does midi, virtual instruments, and looping better than Pro Toos. (that’s how i prefer to work)

Also, note that i haven’t tried Pro Tools 12 yet! (I’ve only used Pro Tools 9.) So, there might be some new features in Pro Tools that i haven’t been exposed to.

If anyone at Digidesign wants to hook me up with a demo or copy of PT12, I would love to do a review of Pro Tools 12. (I still really love Pro Tools, I just cant afford to buy it right now.)

Also, if anyone has any questions about Ableton, or any software designers want me to review their plugins, VSTs, or DAWs, please contact me @puzzlevortex


Review of my new DDJ SX2 DJ Controller

HI guys, its me again. Puzzle Vortex.

In this article, i’m going to do a review of my new DDJ-SX2 DJ Controller.

I’m also going to talk about my plans to release an album of electronic music. Hopefully in the next few months.


In the near future, i’m going to release an album of drum n bass music, some videos i made myself, put up my new artwork, promote everything on social media, and try to start playing live with my DDJ-SX2.

A Little More Info About My Musical Background and My Upcoming Music Projects

Here’s my musical background:

    • I started playing guitar when i was 10 years old.
    • I was in a heavy metal and punk band when i was in high school.
    • I went to Berklee College of Music and got a degree in music synthesis.

At Berklee I learned the basics of hard disk recording, how to create and edit of synth patches, music theory, ear training, counterpoint, how to play instruments like drums, piano, and further education in guitar.

  • Since then, I’ve been mixing music in Pro Tools for about 15 years.
  • I’ve self-produced about 4 of my own projects in the genres of electronic and rap music.

  • Currently, I’m working on a new Drum N Bass Project (under the name PuzzleVortex).

The first PuzzleVortex album will hopefully be finished in the next few months.

    • A month ago, I created this website to write about music production, as well as build an email newsletter.

I wanted to use the site to promote my personal music, art, video projects.

    I also plan on promoting myself to film makers for film scoring projects using online advertising.

For my PuzzleVortex project, I’m doing everything myself including: songwriting, recordingmixing, artwork, videos, etc.

I plan on hiring some freelance voiceover artists, singers, and video producers to add the final touches and help me finish the project.

I also am going to try to play live drum n bass music with my new DDJ-SX2 Dj Controller. I’ve been practicing with it about 3-5 hours a day since i got it. I love it.

My DDJ SX2 DJ Controller Review

I got my DDJ-SX2 DJ controller about 2 weeks ago. I completely love it.

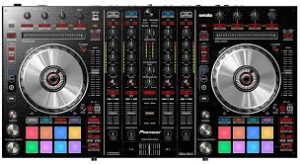
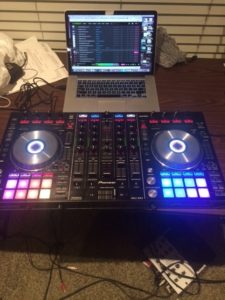
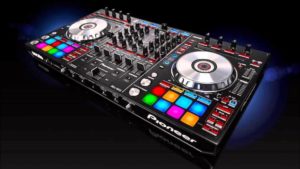
I’ve been practicing with my controller about 3-5 hours a day, since i got it.

Previously, I’ve worked with 2 Technics turntables, but this controller is much different.

The new DJ controllers allow you to create and remix electronic music on the fly. The DDJ-SX2 has alot of tools to help you improvise in a way you can’t with 2 turntables.

The DDJ-SX2 lets you layer, loop, slice, re-mix, and add effects to your songs off the top of your head.

Currently I’m streaming live DJ sets over twitter @puzzlevortex (almost every night).

I love DJing. I see myself doing it alot in the future.

DDJ SX2 Features That I Like:

Hot-Cueing of up to 32 parts

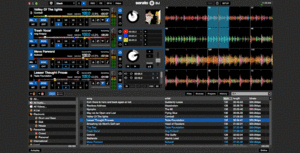
The DDJ SX2 allows you to cue up 32 parts simultaneously, which gives you the ability to create, layer, and remix tracks on the fly.


It has 16 well-made colored pads that let you mark, and easily remember which parts are cued up. You can also use the pads to do auto-looping, and slicing up of the track.

Auto-Looping

There is also an auto-loop feature which lets you loop 32nd, 16th, quarter, etc, just by hitting the pad.

I find myself doing 32nd, 16th, and 8th note loops alot on snare or kick hits to create improvised drum fills.

Slicing

One feature that i’m just starting to grasp is the ‘slicing’ feature.

The 
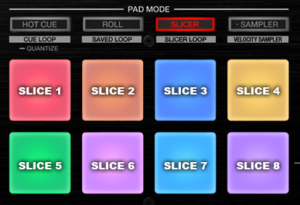
slicing feature lets you re-arrange parts of the song on the fly. As the beat plays, the pads slice 8 bars into 8 pieces.

The pad turns red on the section of music which is sampled.

You can then re-mix the track off the top of your head by using the pads to play with these 8 different pieces.

Auto-Sync Grid and BPM adjustment by 10th of a BPM

A nice feature i just discovered is the Auto-sync grid.

When this is turned 
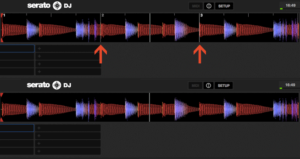
on, Serato shows a grid that tells you exactly where each beat of a song is! It even shows you where the the 1st beat in a 4 bar phrase.

This allows you to mix tracks with really complicated drums, like drum n bass.

You can also adjust BPMs by 1/10th of a BPM.  This allows you to get 2 tracks perfectly in sync pretty easily.

4 Channels are Better than 2

I almost got a 2 channel DJ Controller. Thank baby jesus that i didn’t, because i’m SO glad i got 4 channels. Having 4 channels allows you to do so much more.

You can get a good 2 channel Dj controller for $250. BUT DONT! Get the 4 channel controller. Its better.

It also gives me an extra channel to play my guitar through.

I have my guitar strapped on, and i can mix while i play parts on top of it with my guitar.

6 Simultaneous Effects

The DDJ SX2 also has 2 banks of 3 effects. You can use 6 effects simultaneously.

The mix % can be controlled via knobs at the top of the controller.

You can also download more types of effects from Serato’s website. You can have up to 6 different effects.

I not sure if you are able to control different parameters of your effects other than the mix % by altering it in Serato. I havent really explored this yet.

I’m mostly using the lowpass filter, LFO filter, flange, reverb, and delays. I’ll try downloading some additional effects like flange or chorus to test on my mixes.

Using The Serato Software to DJ

I love using the Serato DJ software.

It lets you look at your music visually, so you can see the changes that are coming before the track plays.

Seeing the music visually is really helpful when you aren’t quite sure if the drums are coming in on the current beat, or after 4 more bars.

Looking at it visually also helps when you are using the auto-loop feature (especially for longer loop times). You can see which parts are about to be looped.

You can also add different effects which can be downloaded from Serato’s website. I’m not sure if you can cue the effects knobs to change different parameters of the effects like the rate of a chorus, or a delay time, which would be cool to do.

Top Features that i Like:

  • Hot-cueing up to 32 parts at once
  • The auto-loop feature lets you do drum fills and re-mix on the fly
  • 8 different effects to choose from. Plus you can download more effects as an addon
  • Serato DJ is included for free
  • Smart Sync Grid in Serato
  • Splicing Feature is interesting. I’m still learning how to use it.
  • BPM adjustment by 1/10 of a BPM
  • High quality pads and knobs compared to cheaper models.

Features i Dislike:

  • It would be nice to control certain parameters of an effect like the LFO rate or delay time. (maybe you can, but i have figured out how to yet)
  • It is a little pricey at $1000, but its worth it.
  • Honestly, i love this thing. I dont have much bad to say.

Where do I get music to play on my DDJ-SX2?

My musical taste has been moving toward drum n bass.

I find myself listening to the sub-genres of liquid, deep, crossbreed, and neurofunk. Sometimes a little bit of hardcore or industrial.

I’ve been getting my tracks off of Beatport, because they have a setup which is similar to a social network where you follow artists you like.

The cost of a track on Beatport is $1.50 – $2.00.

There are also alot of good tracks which you can download for free on soundcloud or bandcamp.

I’m trying to build up a set of about 30 – 40 tracks, that mix well into each other, and in keys that work together, and have parts that i am familiar with.

Streaming My Live Sets on Twitter

One of the reasons i bought the DJ Controller was to start streaming live sets on Twitter (follow me here @puzzlevortex).

There are a 4 services which you can easily stream live music from which include Twitter, Periscope, Twitch, and Instagram.

Hopefully this will get me prepared to play some local clubs.

Please say whats up to me on Twitter @puzzlevortex.

Bassline Tips for Electronic Music

Hi, guys. Its me @puzzlevotex.

In this article, I wanted talk about how to make better basslines.

Your bassline plays a huge role in your mix. Especially in electronic and dance music.

It is the foundation of your track!

It provides the infrastructure which your melodies and chords are built on top of.

Your bassline is the ‘core of your song’ which provides the groove, and it makes a listeners body unconsciously move to the music.

A bassline can be added or pulled out of a track at key times, to get an audience really moving.

I spend ALOT of time working on the bassline for my tracks.

I also like to make and test ‘multiple bass melodies’ to find one that is simple, fits nicely with my drum track, and also has a nice groove.

Sometimes i’ll spend an hour just testing different basslines to find one that:

  • is simple, but melodically interesting
  • has melodic ideas that are repeatable and catchy
  • provides a groove that makes your body want to move
  • leads to the next chord in an interesting way

Other important aspects of a bassline include:

  • its tone (the synth patch)
  • how it is EQed in your mix
  • how effects are applied to it in your mix.

Finding a Good Bass Tone or Timbre

An important part of your track, is the tone or timbre of your bass sound.

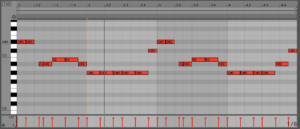
If you use a good hardware synth or VST synth plugin (like Serum), you’ll save alot of time searching for the right tone.

BUT, If your not working with a great synth sound, you can always improve the tone and color by adding EQ and effects.

I like to program my basslines with midi, then cycle through the bass presets in Serum until I find one that fits in the mix and has a unique, memorable sound.

EQing Your Bass

How you will EQ your bass track, depends on the other instruments in the mix.

Here are the most Common ways i will try applying EQ to my bass tracks:

  • I try boosting the upper end of the bass sound around 200 – 400 hz to add color and make the upper end of the bass sound stand out in that range.
  • Sometimes i test cutting off all of the high end frequencies of the bass using a low pass filter at around 80-200 HZ.
  • If you aren’t getting enough of a booming bass sound, try boosting it at around 80 hz.

(There are no rules, whatever sounds good is what is right)

Making an Interesting Bass Melody

Your bassline provides a feeling of movement and a groove.

It leads the listener to the next chord, and tends to move in sync with the kick drum.

Here are 3 ways you can make your bass melody more interesting:

  • try using larger intervals.
  • try using repetitive motifs that are catchy and memorable.
  • try  to create a groove that makes your body want to move to the music.

A bassline that i love is “Hell of a Life” by Kanye West.

The reason i like the bassline in “Hell of a Life” it that has a catchy melodic idea that is repeated multiple times.

I like how it sounds when it goes down to the low f# note.

It also has a nice groove that stands on its own without needing much help, other than a drum beat.

I try to make a bassline that stands on its own with no accompaniment. (like the bassline in ‘Hell of a life”).

How to Draw in Moving Filters on your Bassline

One way to make your bass sound unique is to draw in some filter movement.

You can use peak, lowpass, or highpass filters to change the tone of your bass sound in a rhythmic pattern.

Filter movement will make your bass sound more interesting, without altering your groove and progression.

The Wobble Bass Sound

The ‘wobble bass’ sound, used by artists like Bassnectar (one of my favorite producers), is a cool effect that can be created with a filter, to cutoff or boost certain frequencies.

Here’s a video that shows how to use a sine wave LFO to control the movement of a filter on a bass in FL Studio:

How to create wobble bass with a peak filter

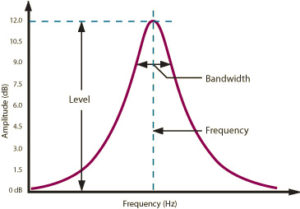
A ‘peak filter’ provides a boost of a narrow band of frequencies.

The frequency band of your peak filter can then be swept in a rhythmic pattern by using plugin automation to create the ‘wobble effect’.

You can also try sweeping low pass or highpass filters in the same way.


The image to the left shows what it would look like if you drew in some low pass filter movement with plugin automation.


Using Presets with Moving Filters on Your Bass

Synth VSTs like Serum have lots of cool presets which will give you that  ‘wobble bass’ sound, without using automation.

The filter movement on these presets can be controlled with an LFO, an envelope, or a side-chain. You can then alter the sound my changing the parameters on the LFO, envelope, etc.

Using Tuned 808s as a Bassline

An 808 kick hits a listener hard in the same way that a rock guitar does.

A ‘tuned 808 kick’ is a kick that has a pitch.

Tuned 808s can be used in place of, or in combination with, a synth bassline to provide a groove and a progression.

You can make your own tuned 808s with a sinewave oscillator and an envelope. Or, you can find a pack of tuned 808 sounds to download. (try googling ‘free tuned 808 samples’)

Here’s a video showing how you can tune your 808s in Ableton:

Adding Effects to your Bassline

Effects can be applied to improve the timbre, color, wideness, and help your bass mix better in your track.

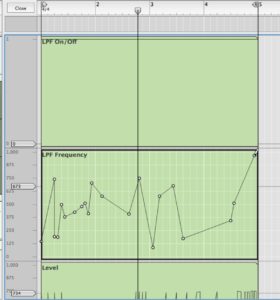
There are no rules in music. You can apply effects however you like.

BUT, i will commonly try certain effects when i’m creating a bass sound.

Effects i like to test on a bassline include:

Distortion – I like using distortion on bass to add color to the sound as well as adding a bit of energy to the upper end of the sound in the 200 – 400 hz range. Distortion also sounds really good on tuned 808s.

Widening – I like to use a widener to create a large bass sound in the mix. Stereo effects like reverb, chorus, and distortion can also be used to widen a track.

Chorus – a bit of chorusing can sound good. I tweak the rate, to give it a bit of movement,

Flange – a little bit of flange sounds cool and provides movement.

Reverb – adding a bit of reverb sounds good, but i try not to overdo it.

I think i covered most aspects of creating a bassline. BUT, if i missed something or you have a tip you think i should include, tell me @puzzlevortex

*Also, i’m starting to do live streams djing drum n bass on twitter. I just got a pioneer DDJ-SX2, so i’m going to be practicing with it alot.

Using Side-Chaining and Rhythmic Filters on Pads and Strings

One cool effect that you create with any type of sustained note or chord progression, is to break it up into a rhythmic pattern, similar to the ‘pad sound’ on the Timbaland produced track ‘my love’.

4 Ways to Add Rhythmic Effects to your Pads

There are different ways you can add rhythmic effects to your strings or pads.

This type of effect sounds really good when you have a nice chord progression, and you break it up into a rhythm.

I’ll go over 4 different ways to do this:

  1. Side-Chaining a Gate or Compressor

One way to break up a pad or strings into a rhythmic pattern is by side-chaining a gate to a kick, snare, or percussion track to add some rhythmic movement. A gate will cut the volume in time with the kick or percussion.

Side-chaining can also be done with a compressor to create a ‘pumping effect’ on the pad, which also sounds good.

Here’s how you can sidechain a gate to your pad:

To sidechain a gate to your pad, you need to create 2 tracks.

A drum track and your pad track.

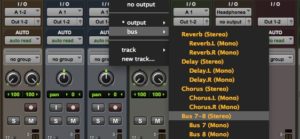
Next, route the output of the drum or percussion track, to a bus that will be used to trigger the side-chain on your gate on the pad track.


Change the key input on your gate (or compressor) to the bus that is on the output of your drum track.


Then, click the key input button on the gate or compressor.


Now the gate or compressor will be triggered by key input, which is the bussed audio from the drum track.

I’m doing this in pro tools, but its pretty much the same concept with any other DAW.

2. Using a Rhythmic Filter to Break Up a Pad

Another way you can break up a pad, is with a rhythmic filter.

There is a stock plugin in protools which has some nice rhythmic filter effects as presets called AIR Filter Gate.


Air Filter gate allows you to change the pattern, rate of the notes, and other aspects of how the filter is triggered. Filter Gate is one of my favorite plugins.

3. Chopping up an Audio file in a Rhythmic pattern

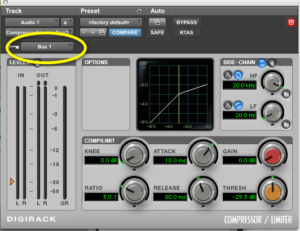
One more way you can add rhythmic effects on a pad, is by chopping up the wave form into a pattern.


This is probably the easiest method. Just delete sections of the waveform in a pattern, to create a nice effect on a sustained note.

4. Using Plugin Automation to Draw Effects in a Rhythmic Pattern

Another way you can chop up a pad into a rhythmic pattern, is by drawing in plugin automation.

You can use any plugin this way by automating the master bypass.

Just pull an effect in and out of a track by turning its master bypass on and off with plugin automation.

What can you trigger with a key input?

Key inputs are not found on every plugin, but ones they are usually found on are gates, compressors, de-essers, filters, lfos, and eqs.

In addition to effects, you can use a key input to trigger an LFO or Envelope and use that to modulate the pitch, volume, effects, etc of a sound.

If you have any other ways you like to use key inputs, let me know @puzzlevortex


Using Filters to Mix Music and Warp Audio

Filters are used to ‘boost or cut’ certain frequencies of a track, or to change a sound for creative effect.

Static filters‘ like a high-pass filter (HPF) might be used to remove unwanted low-end frequencies from a vocal track. It would also help separate the vocal track from the other instruments, like guitar, and add clarity to your mix.

Moving filters‘ like a band-pass (BPF) controlled with a sinewave LFO would create an auto-wah effect. Any type of filter or parameter can be controlled this way with an LFO to create different types of sounds.

Filter types include: high pass (HPF), low pass (LPF), band pass (BPF), notch, peak, and comb filters.

Why Would You Add or Remove Frequencies with a Filter?

It is important to remove frequencies, so instruments don’t occupy the same space in a mix.

A piano and guitar occupy some of the same frequency range, so you might use filters to separate them.

Filters also let you add frequencies for creative effect.

For example, you might add 80HZ to a bassline to give it a more booming bass sound.

Types of Filters

All filters either ‘remove or add certain frequencies’ to a track. The most commonly used types of filters include: high pass, low pass, band pass, peak, notch, and comb filters.

High Pass (HPF) – a high pass filter removes the low frequencies below a point.

Low Pass (LPF) – a low pass filter removes the high frequencies above a point.

Band Pass (BPF) – band pass filters allows a wide or narrow band of frequencies to be heard and removes the highs and lows.

Notch Filter – notch filters can be used to remove frequencies in a narrow band, like hissing on a vocal sound.

Peak Filter – peak filters boost a frequency in a narrow band.

Comb Filter – a comb filter is a type of signal processing which creates a slightly delayed digital copy of itself.

This causes constructive and deconstructive interference in a waveform that creates a series of peaks resembling a comb.

Comb filters are used mostly for creative effect. Comb filters create a sound which is similar to a phaser or a flanger.

How to Control Filter Parameters

Filters might be used to separate frequencies of your tracks, or they can be used to creatively color or mangle your sound.

You can also control the parameters of your filters with LFOs (low-frequency oscillators), envelopes, sample and hold, and side-chaining.

LFOs

Low frequency oscillators like a sinewave, squarewave, or sawtoothwave can be used to control ANY parameter of a filter.

For example, you can use a sinewave to control the frequency of a bandpass filter and make an auto-wah effect.

If you used a sinewave to control the volume, you would get a tremolo effect.

If you used a sinewave to control the pitch, you would get a vibrato effect.

Envelopes

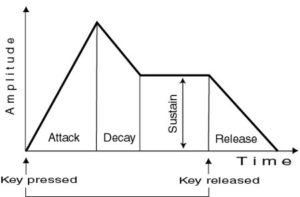
A a sound’s envelope is the attack, sustain and decay of a sound.

You can use the envelope of a sound to control parameters like pitch or a bandpass filter.

Sample and Hold

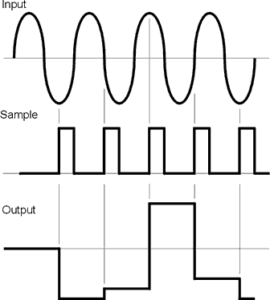
Sample and Hold is a type of LFO that ‘grabs and holds the voltage’ of a signal, then lets go after a certain period of time.

It creates an almost random sounding movement of a filter.

Sidechaining

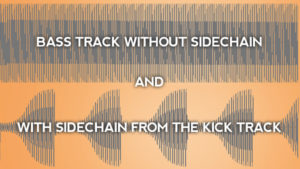
Sidechaining allows you to control a filter with the input of another track.

For example, if you side chained a kick drum to control a the frequency of a band pass filter, each time the kick hits, your synth would create a wah effect.

Sidechaining a Filter to Warp your Audio

One interesting effect that can be done with sidechaining, is to use a kick drum to trigger a filter sweep, each time the kick hits.

Here’s a video that shows you how to sidechain a filter to a kick drum in Ableton for a cool effect on a synth pad:

2 Filter Plugin Reviews and Demos

Etch 

I liked Etch, because it really allows you to warp the characteristics of a sound.

Etch allows you to easily tweak MANY of parameters to create some very unusual sounds.

The Etch presets were divided into 6 sections: non-moving filters, sweeping filters, light coloration, heavy coloration, crazy, and self resonating.

Here are the Features i liked:

    • radically altered the sounds
    • i liked messing with the self resonating filter patches and using them to really warp the sounds.
    • also included the basics like bandpass, notch, resonating.
    • i like the simple interface
    • certain parameters altered the sound so much, they were like instruments

Features i disliked: none. It has everything i would want included in a filter plugin. The interface is also easy to work with.

Advertised features of Etch:

  • 3 classic synthesizer filter models
  • traditional filtering including: high-pass, low pass, band pass, notch, and peak filters.
  • comb filtering for detuning, pitch-wobble, and chorus/phaser textures
  • internal TransMod modulation system

Etch comes in VST, AU, and RTAS formats.

The cost of Etch is $99. Try a demo of Etch here.

Filtershaper 3

Filtershaper3 does give you the ability to color and warp a sound using multiple filter types.


Here are the Features i liked:

    • it provided basic filtering to create effects like tremelo, phasing, and wobble.
    • simple interface

Features i disliked:

  • had to dig into the settings to create interesting sounds
  • presets were unorganized
  • pop-up window, when you alter a present, then try to move to the next preset.

This plugin comes in VST and AU format.

The cost of Filtershaper3 is $79. Try a demo of Filtershaper3 here.

Reverb Mixing Tips and 3 Reverb Plugin Reviews

In this article, I talk about: 

  • Reverb Basics: What is Reverb?
  • 4 important Reverb Parameters you can tweak
  • 6 tips to help you apply Reverb to Vocals
  • I also tested 3 Reverb Plugins including: Eaverb, Sparkverb, and Toraverb. I link to the demos at the bottom of the article. (so you can test them if you want.)

*ALSO, This week I started a 30 day Ableton Live free trial (i’m a Pro Tools user). So far, I love Ableton. If you use virtual instruments, you need to check it out. I’ll give a full review of Ableton in a couple weeks.

Reverb Basics: What is Reverb?

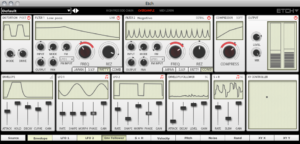
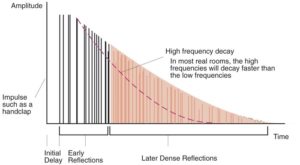
Reverb is the sound reflection that a listener hears when it bounces off of a surface in a room, or surface of an object.


The density and type of material that make up a surface, as well as the number of surfaces, determines how a sound reflects around a room, and what the reverb will sound like.

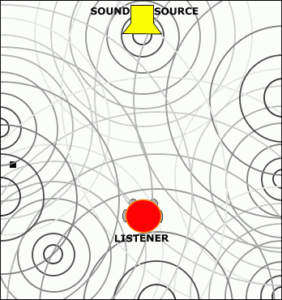
For example: a square room with 6 surfaces will have less reflective surfaces than a church. There will be less reflections as a result.

The density of the surface also determines the type of frequencies that will be reflected back to the listener. Certain materials might absorb or reflect high or low frequencies.

For example, a church with marble floors or walls will also bounce back a different spectrum of frequencies, than a carpeted room.

4 Reverb Parameters to Tweak

Here are 4 parameters of a reverb that you can tweak to get the sound you want. They are 1) early reflections, 2) decay time, 3) damping, and 4) pre-delay.

  1. Early reflections are the initial echoes that are heard when the first reflections hit the listeners ear.


These early reflections usually occur within 5 – 20 milliseconds after the initial sound.

  • Louder early reflection settings tend to be used on longer sustained sounds like vocals, instead of drums.

2. The decay time is the length it takes for the last perceptible echo to
be heard by the listener.

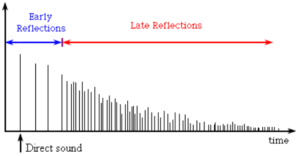
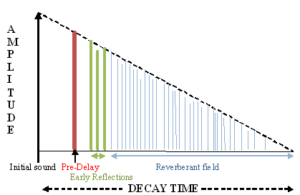
The longer the decay time, the longer it will take your reverb reflections to die out.

Longer decay times might work better when instrumentation is minimal, but they can make a mix sound washed out in a complex arrangement with many instruments.

3. Pre-Delay is the time it takes for a sound to generate its first reflection.

  • Try increasing the pre-delay time to add separation and clarity to vocals and instruments.

4. Damping occurs when a reflection hits a soft surface, such as a carpet, and it loses some of the high frequencies in its reflection.

  • If your reverb sound contains too many high frequencies, try increasing the level of damping.

6 Main Types of Reverbs

Reverbs used in music production usually fall within the 6 categories below:

Plate: A plate reverb is a method of generating reverb in which a sound was played into a metal plate, held in place by springs. Digital plate reverbs mimic this technique.

Plate reverbs are commonly used in production on vocals, organs, and snare drums to give them length, width, and a bright sound.

Hall: A hall reverb mimics the reflections that occur in a concert hall. This type of reverb generally lasts between 1.2 to 3 seconds.

Halls reflect from the low end of the frequency range.

Hall reverbs can add 3 dimensional ambience and width to a mix. Halls tend to have strong first reflections and can be used on lead vocals, strings, or a stereo mix.

Chamber: a chamber is a smaller space than a hall an creates reverbs ranging from .4 to 1.2 seconds. Chambers can be used on pads, vocals, or drums.

Room: A room reverb mimics the acoustic reflections of a small room.

Room reverbs have a ‘short decay time’, that can last between .2 to 1 second. The reflections of a room reverb are initially strong, but fade quickly. Room reverbs can be used on stereo mixes, drums, or guitar.

  • Room reverbs can also be used as a slap delay alternative, by lengthening the pre-delay and shortening the reverb time.

Spring: a spring reverb simulates the reverb generation method in which a sound was played through a metal spring by a transducer; a spring reverb is most commonly used in guitar amplifiers.

This type of reverb gives a vintage sound and is most commonly used on instruments like organ or guitar.

Reverse Reverbs: with this type of reverb the sound of the reflections runs in reverse, gradually getting louder instead of quieter.

6 Reverb Tips for Vocals

Here are a few tips you might test out when tweaking a reverb on your vocals:

    1. Use longer pre-delays to add clarity by separating the vocals from your initial reverb reflection.
    2. Try EQing the send to remove unwanted high and low frequencies, that can make you mix muddy.
    3. Compress the reverb after it hits the plugin to smooth it out.
    4. Try pumping a dry vocal into a natural space and record the natural reverb and ambience of a real room.
    5. Add in your reverbs while playing the full mix, instead of while you are soloing the instrument or vocals.
    6. If you have a complex arrangement, reverbs that are too long will make your mix sound washed out.

Reviews of The 3 Reverb Plugins I Demoed

SO, I tested demos of 3 well rated reverb plugins in Ableton that are available in both VST/AU format. They include: Toraverb, Eaverb, and Sparkverb.

The plugins cost in the range of $40 – $150. All of the plugins have demos 10 – 14 day demos, so you can test them yourself.

Toraverb Review

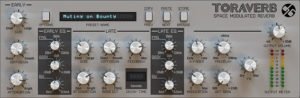
Toraverb is a great, low priced plugin at $45. It is well rated, and it was my favorite, even when compared to the $130 – $150 reverb plugins.

Here are the Features i liked:

    • simple interface – i preferred the simple knob interface over the graphical interface of the more expensive plugins. Some of the features of the other plugins i felt were a bit overkill.
    • sounds great – i preferred the presets and overall sound of Toraverb over the more expensive reverbs. It just sounded better to me, when compared to the others.
    • low cost – it costs $45, compared to $130 – $150.

Features i disliked:

      • none. It sounded great, its pretty cheap, and i preferred the simple, classic interface.

Advertised Features of Toraverb

Toraverb features include: high quality diffusing algorithms that eliminate flutter echo effects, equalization of early and late reflections, modulated tail, and spacial reflections.

It was rated 5 stars, out of 116 ratings.

It comes in both VST and AU format. The cost of Toraverb is $45.

You can download a two week free trial (with some limitations) of Toraverb here.

EAreverb Review

Eaverb is well rated, has MANY features to tweak, but it more expensive reverb plugin at $136.

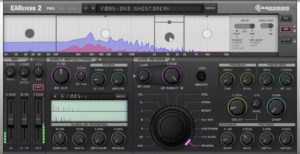
Eaverb has a nice graphical interface, and has MANY parameters you can tweak. (Almost TOO many.)


Here are the Features i liked:

      • many, many tweakable parameters
      • graphical interface
      • you can alter the left and right reflections individually
      • POS mode – you can position a sound in anywhere in a room
      • i preferred working in SE mode (which is a simpler interface)

Here are the Features i disliked:

      • i felt it was overkill.
      • it didnt sound as good as the cheaper $45 Toraverb
      • the cost is a bit high at $136

Advertised Features of Eaverb

It has six different reverb algorithms including: natural, bright, Alu box, Auditorium, Plate, and Reverse.

It includes three modes including: Pro mode that gives access to all features and parameters.


 SE mode provides a simpler, limited, interface to create your reverb sound.


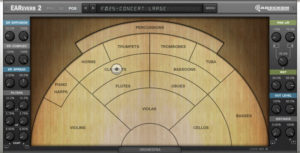
 POS mode allows you to place an instrument in a particular location in a room.


Eareverb comes in AU, AAX, VST format. The cost of Eareveb is $136

You can download a free trial of 10 day trial of Eareverb here.

Sparkverb Review

Sparkverb is a high quality reverb, which has a unique interface and make 
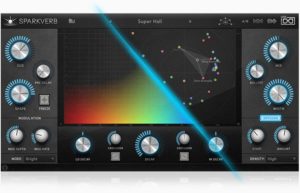
dialing in the right sound a quick, and simple process.

It has a feature called Preset Voyager, which allows you to surf though presets based on their characteristics.

Here are the Features of Sparkverb i liked:

      • the interface is pretty cool, it makes altering the sound very easy.
      • Preset Voyager mode is cool. It lets you surf through presets based on a graphical representation of their characteristics, instead of one by one.
      • tweak parameters easily
      • sounds pretty good

Here are the Features i disliked:

      • the cost is a bit high at $150
      • didn’t sound quite as good to me as the low priced Toraverb

Advertised Features of Sparkverb

It allows you to adjust decay globally, across multiple frequency bands w/ hi-lo multipliers and crossovers directly with a single interface.

The supported formats are AU, AAX, and VST.

The cost of Sparkverb is $149.

You can download a 15 day free trial of Sparkverb here.

Vocoder Plugin Tips, Tricks, and Reviews

A vocoder is an effect that uses two signals, such as a vocal (the modulator), where it captures the formants of the voice, and combines it with another sound such as a synthesizer, guitar, or even drums (the carrier).

Vocoders create what is sometimes referred to as a ‘talking synthesizer’. This effects has been used by artists such as Daft PunkImogen Heap, and Herbie Hancock. 

I have an Electrix Warpfactory hardware vocoder, which i bought over 10 years ago. It works ok, BUT outboard gear, (especially a vocoder) is a pain to setup! I prefer vocoder plugins, due to the easier setup, larger set of features, and the ability to use plugin automation.

A vocoder can transform a weak sounding vocal (like mine) into a complex synthesized sound when you play wide, complex chords over it.

If you turn up the modulation, the sound becomes very robotic. (Think beastie boys: intergalactic, planetary, intergalactic)

Below i created a list of vocoder tips and tricks as well as songs from Daft Punk and Imogen Heap that show what you can do with a vocoder. I also reviewed some of the best vocoder plugins including Vocalizer Pro, Orange Vocoder, Vocoder II, XILS Vocoder 5000, and the XILS V+ vocoder.

Unfortunately, i couldn’t find any free vocoder plugins for you :(, but there are some paid options i review below ranging form $59 – $200. Most of them let you demo the software for free. (Also get a free samplepack here)

Examples of vocoders in electronic music

Daft Punk – Around the World

Imogen Heap – Hide and Seek

Herbie Hancock

Vocoder Tips and Tricks

Here are a few tricks you might use to get the most out of your vocoder plugin:

    1. Certain types of vocals such as consonant sounds and plosives will be more audible when you combine them with a synthesizer. Vowel sounds are less audible.
    2. Vocoders sound great when you combine vocals with wide complex chords. Some patches might work better due to the harmonic content in the high end (5-10k) of the frequency spectrum. A complex chord might sound better than a single note.
    3.  Boosting the high-end frequencies above 5K and distorting the modulating signal can make vocals more audible.
    4. You can increase the ‘modulation‘ to create a sound that is much more robotic. (like beastie boys: intergalactic)

  1. Try adding effects such as distortion or lo-fi (lowering bit rate) to the signal before it enters the vocoder.

Vocoder Plugin Reviews

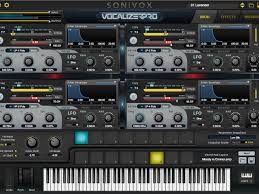
Vocalizer Pro – This plugin has 4 synthesis modules that can be combined or rerouted through each other.

It also has 16 filter configurations with full envelope, cutoff, resonance, and saturation controls, and a sync-able LFO with multiple waveforms, pitch envelope, balance control.

  • Its available in AU, VST, RTAS and AAX formats
  • Cost $200. It is a very well reviewed plugin. Try a free demo Here

Vocoder II

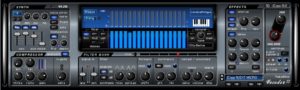
Vocoder II is a low cost ($59), well rated, vocoder with a decent feature set.

Vocoder II contains a Vocoder module, a built in Synth, Compressor and an Effects module, with Chorus and Delay.

The user mode allows producers to adjust each of the 17 vocoder filters with plugin automation.

Vocoder II works with internal and external signals for analysis and synthesis. From a mono voice it is possible to generate polyphonic sounds, complex ambient textures, and robotic sounds.

Vocoder II is well rated and available in VST format only.

The cost is $59. Try the Free Demo here.

XILS Vocoder 5000 

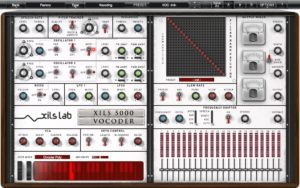
Based on the classic hardware vocoder from the 1970’s allows you to process vocals, guitar, or even drums.

This plugin emulates an oldschool vocoder, but lets you change parameters with plugin automation.

It is available in VST, AU,  RTAS , AAX formats.

The price is $159. Try a free Demo here

XILS V+ Vocoder

The XILS V is based on the classic hardware vocoder.

It contains a ten band vocoder, an octave divider based on human voices and strings, plus reverb and phasing effects.

It allows LFO and envelope modulation and all features and parameters can be automated with midi.

It comes in VST, RTAS, AAX formats. Try a free Demo here

The cost is $159.